How to Dye Leather - For all smooth leathers
How to Dye Leather - For all smooth leathers
Dying leather is an art not a science. Variations in materials, conditions and artists touch will have a direct effect on the result.
There are three main steps to any leather dying project.
1. Preparing the Leather for Dying.
2. Applying the Dye.
3. Finishing with a Top Coat.
There are several types of Dyes available on the market today. The two most popular are waterbased Pigment and solvent based. Zelikovitz Leathers manufactures waterbased eco-friendly products.
For the purpose of this guide we will begin with Zelikovitz Professional Pigment Dye. This product is currently available in 20 colors. And finish up with a brief note on solvent dyes at the end of the guide.
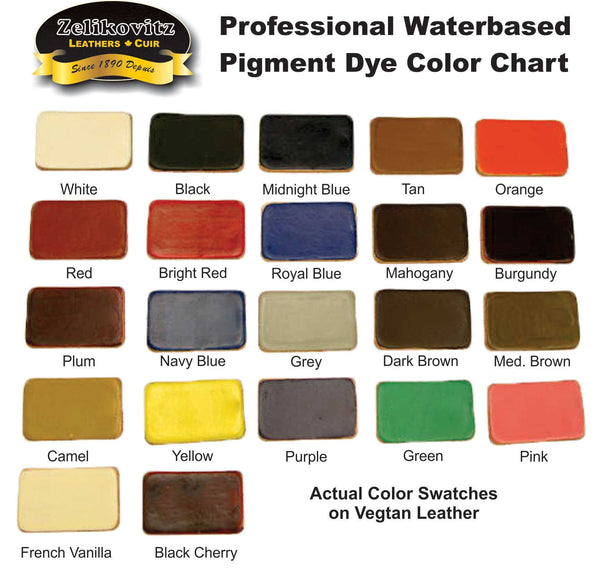
Leather is a substance of nature and varying composition... Differing in porosity and fibre structure... No two leathers will always accept a given dye giving uniform results. Therefore, it is suggested that the colour chart be used as a guide only and that you should always test a swatch before attempting your finished product.
Zelikovitz Professional Leather dye is a water base pigment. Think of it much as you would a water base house paint. You can wash your hands and tools with water and once dried it is colour fast.
1. Preparing the Leather for Dying.
In the tanning process, various protective surface finishes are given to leather hides. Over the course of the life of the project, you may have applied conditioners and protectors and no doubt dirt has accumulated on the surface of the leather. You must remove all this prior to any dye job. This will give you a clean surface and create the byte required for the dye to attach to the leather properly.
The best product to use for this is ZeliPREP leather preparer/deglazer.
This is applied with a damp sponge or rag. Make sure you use a white rag because you don't want the color from the cloth transferring to your project and hands. An old white t-shirt works best. You will notice that the finish will be removed as well as some of the color.
2. Applying the Dye.
After the leather has been cleaned and prepared as recommended above, you need to make sure you mix the dye well before use. Try turning the bottle upside down and shaking. You may have to give it a little stir with a stick to loosen the pigment at the bottom of the bottle. You can apply with a cloth however a sponge brush works best. An alternate method for covering large areas evenly is to spray with a spray-gun or air brush. Apply a thin coat, brushing in one direction. A second thin coat of dye may be applied if required. Be sure to brush in the opposite direction. If you went left to right on the first coat, brush up and down on the second. In some cases a third coat may be applied.
Here's a handy tip. If you use a sponge brush and notice air bubbles forming on the surface, blow gently on them and they should pop.
Do not use a wool dauber or shearling, as they tend to hold back the pigments.
Allow to dry between coats. If you want a lighter shade, try a coat of white first. If you want a darker shade, apply a coat of black. You can change the colour of leather and some vinyl. It is best to try a test in a small area first.
Dye Mixing: Because Zelikovitz Professional Pigment Dye is water based, it is very easy to mix colours. The dye applied full strength will go on opaque. If you want a translucent finish or ?stain? you can mix with 50% water and 50% dye. You should do some trials on a swatch first. You can comfortably do a 75% water and 25% dye mixture. An infinite number of colours and shades are possible by combining existing dyes to create your own colours. The basic rules of any colour mixing apply.
For example:
Yellow and Blue = varying shades of Green,
Yellow and Red = varying shades of Orange to red,
Red and Blue = shades of Deep Purple to Lavender
Red and Purple = Wine
Brown and Yellow = Golden Brown or Tan,
Brown and Red = Maroon to Dark Brown
An infinite number of color shades are possible. Mixtures should always be tested on swatches until the desired color is achieved.
3. Finishing with a Top Coat
After you finished the first two steps and the dye is completely dry, it is recommended that you finish the project with some sort of top coat. Although it is not always necessary with our pigment dyes, it is with the solvent based dye.
Zelikovitz Professional Acrylic Leather Top Coat is available in the following formats: Matt Finish, Satin Finish, Gloss Finish with Carnauba Wax. This can be applied with a sponge, dauber or cloth in a circular motion.
Alternatively, you may want to finish the project with a mink oil cream for waterproofing or one of our other fine products available in our e-store.
Zelikovitz Professional Pigment Dye... For dyeing leather shoes, boots, handbags, belts, hand carving projects ..
Solvent Based Dyes
1. Preparing the Leather for Dying.
The process for preparing the leather is the same as above for Zelikovitz Professional waterbased Pigment Dyes.
2. Applying the Dye.
For solvent based dye you will need to apply evenly using a piece of woolskin, cloth or a dauber. As with the pigment dye, larger areas should be done with the spray method. After dying, remove excess surface dye by rubbing briskly with a soft cloth. Unlike our waterbased pigment dye, you will need to be very careful and watch where you put the dye. Clean up is not as easy so wear rubber or latex gloves.
Color Control:
When changing from a previously dyed color, it is best to do it in two steps.
First, neutralize the original color with an intermediate color.
Then repeat the dying process with the final color desired. For example:
To dye white leather black, dye it green or blue and then black.
For white into dark blue, first weak black (4 to 1) then dark blue
For white into brown, first dye light green, then brown.
For red into black, first green then black.
For green into black, first red, then black
For white into bright red, first yellow, then red.
For white into dark red, first tan, then dark red.
Always let the first color dry before applying the second.
3. Finishing with a Top Coat.
Because the solvent dye leaves a flat haze on the surface of the leather and the color will transfer if not sealed, You will need to apply a top coat as mentioned above.
For more information on solvent based dyes, there is a really good book called Fantastic Finishes in our store. Hope you found this guide helpfull.
Zelikovitz Leathers and Crafts - Since 1890